iPhones
Updated on 19 December 2025
19 December 2025
16 mins read
Haziq
Tech Expert for Back Market UK, Ireland & Australia
It’s a familiar story: you dropped your iPhone and its screen completely shattered. Or maybe it’s randomly become unresponsive to touch, or some of the pixels have died. There is a plethora of reasons why you may need to look into iPhone screen replacement. We know, however, that it costs a pretty penny to have it professionally repaired. If you’re not willing to spend the cash to get it fixed, we totally understand. That’s why we’ve put together this iPhone screen replacement guide that’s easy to follow at home.
Replacing an iPhone screen yourself isn’t as complicated as it seems. All you need to do is order the right replacement parts for your specific iPhone model. Then you can begin the process. Replacing the iPhone screen will involve preparing your phone for disassembly and then removing the damaged screen from the phone. Once the original screen is removed, proceed with cleaning off all the old adhesive from the phone. Then, align your replacement adhesive to the bottom of the phone and press it into place. At this point, reinstall the connector shield and align the new display before pressing it down into the adhesive. Turn the phone over and apply pressure to the perimeter by putting some heavy books on the phone and leave it for about 30 minutes.
We know the internet is full of tech advice, so it’s hard to discern what’s trustworthy and what’s not. And you don’t want to follow the wrong advice for something like this—iPhones are not cheap things to fix or replace. But you can rest easy that our guide to replacing an iPhone screen yourself won’t lead you astray.
At Back Market, we work with certified refurbishers who know these devices inside and out. They perform checks, repairs, and replacements daily, including on broken iPhone screens. As a result, it’s safe to say you can trust our expertise when it comes to what to do and what not to do when replacing an iPhone screen at home.
Not only will we share this knowledge with you, but we can also provide you with a self-repair kit for your specific iPhone. And in this article, we’ll outline the safest, easiest way to fix your iPhone screen at home, so you don’t have to pay the hefty price of Apple repair.

Replacing an iPhone screen at home isn’t as complicated as you might think.
Before we dive into the process of replacing an iPhone screen yourself, let’s quickly go over what you’ll need and what you’ll learn in this article. In order to replace your screen, you’ll first need to order the correct parts and tools for your specific iPhone. Back Market has partnered with iFixit to provide self-repair kits that you can order online. These kits typically come with the following parts:
A replacement screen
A spudger tool
An opening suction with a handle
Angled tweezers
A precision bit driver
You may also need a lint-free cloth and a hair dryer or heat gun at home.
Then, we’ll go over how to remove the damaged screen and install the new one step by step. Armed with these tools and this guide, you’ll have your iPhone screen replaced in no time.
Of course, before installing a new iPhone screen, you’ll need to carefully remove the old one. This is a process in and of itself, so let us walk you through the best way to do it.
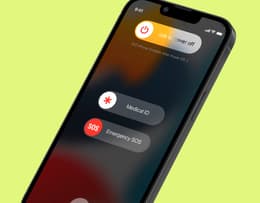
Before removing the old screen, you’ll need to turn your phone off.
Before attempting to remove the old screen and replace it with a new one, you need to prepare your phone to be disassembled. You can do this in just a few easy steps:
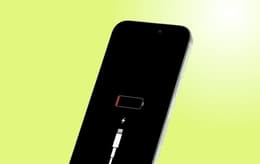
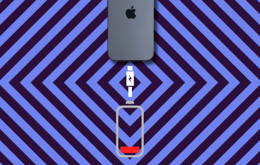
Let your phone drain to 25% battery or below. A full battery can be a hazard when disassembling the phone.
Unplug your phone from any chargers or other cables.
Power off your phone.
If your screen is cracked, tape over the glass to ensure shards don’t get everywhere. This will make disassembly and cleanup easier and protect your hands in the process.
If you’re using opening picks, it’s essential to know that inserting the picks more than 3mm into the phone can cause further damage. It’s a good idea to measure 3mm into the edge of your picks and mark it to make sure you don’t insert them too far.
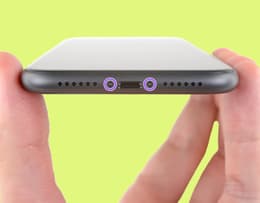
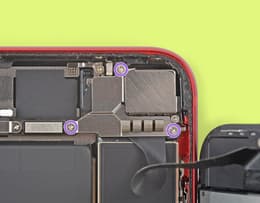
The first step to removing the screen is to remove the pentalobe screws.
Once your phone is powered off, you can start disassembling it. Your first move will be to use a P2 pentalobe screwdriver to remove the small screws that you’ll find on each side of the charging port. You will find one on each side.
Take care to use the correct screwdriver—a small Phillips screwdriver could damage the phone. Once you remove the screws, put them somewhere safe where they won’t get lost, as you will eventually need to put them back in once your screen is replaced.
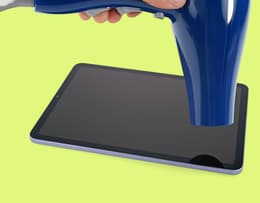
Next, heat the bottom edge of the phone to unstick the adhesive.
Once the screws are removed, you’ll need to start unsticking the existing adhesive. Using a hair dryer or a heat gun, start heating the bottom edge of the iPhone until it’s hot to the touch. Be very careful not to overheat it, which could damage other components inside.
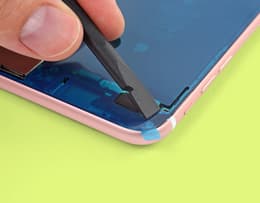
Attach the suction and use the handle to lift the bottom edge of the screen.
Now it’s time to use the opening suction that was included in your self-repair kit. If you didn’t get a self-repair kit, any small suction with a sturdy handle or ring will work.
Attach the small suction to the screen near the bottom. If it won’t stick, apply a small amount of moisture to the inside and press it gently down onto the screen.
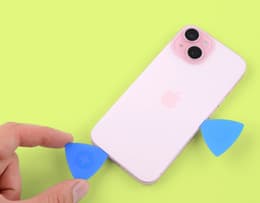
Gently but firmly, pull up on the suction’s handle or ring enough to create a small gap between the screen and the frame of the phone. Once you have this gap, carefully insert one of your marked picks into the gap. Remember not to insert the pick in further than 3mm.
Once the pick is in the gap, gently slide the pick back and forth along the bottom edge to slice the adhesive. You will need to leave this pick inserted into the gap to make sure the adhesive doesn’t reseal while you move on to the other edges of the phone.
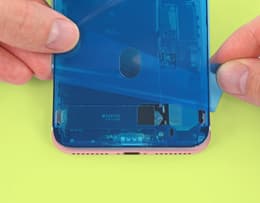
Heat and lift the rest of the screen the same way you did with the bottom.
With the pick still inserted into the bottom edge, move counterclockwise around the phone’s screen repeating steps three and four. So, heat the right edge of the phone with the hair dryer, and slide another pick into the gap. Slide the pick up and down the right side. You may encounter a stop when you near the power button; this is the right clip. Gently twist the pick when you encounter this to increase the gap and release the clip. Insert another pick on the other side of the clip to hold the gap open.
Moving to the top edge, heat it and slide a pick along the edge the same way you did for the bottom and the right sides. You will likely encounter the left screen clip on the other side of the top edge. Again, twist the pick to increase the gap and release the clip.
Now, move to the left and final edge. Heat it, and slide a pick along the edge. On this side, there will be two delicate cables that connect the screen to the phone. For this reason, be extra careful about the 3mm distance for inserting the picks here.
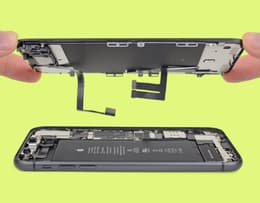
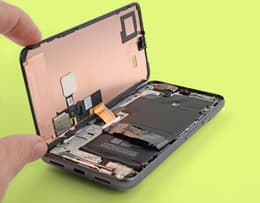
Gently swing the screen open from the left side and unfasten the connector shield.
Now, you can fully detach the damaged screen. Gently swing the screen open from the left side so as not to damage the cables on the left. It’s almost like gently opening a book. If you can’t open it or something feels stuck, move back around the perimeter of the phone with your picks to remove any stubborn adhesive or stuck clips.
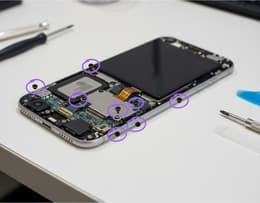
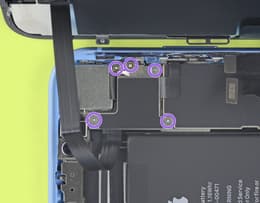
Once the screen is opened, you should see a metal plate around the cables attached to the phone by screws—this is the connector shield. Use a tri-point Y000 screwdriver to remove these screws. Depending on the model of your iPhone, there could be more than one screw.
Once the screws have been removed, use a pair of angled tweezers to lift the shield to a 90-degree angle before unhooking and removing it. Make sure you keep these components in a safe place and don’t mix them up with the other screws you’ve already removed from the phone.
Disconnect components like the front sensor and connector cover to continue removing the old screen.
With the shield removed, you should now see the components underneath: the front sensor and the connector cover attachments. You can use the tip of an opening pick to gently get underneath the front sensor and pry it up to disconnect it.
You can now use the same tri-point Y000 screwdriver to remove the screw that holds the cover connector in place. Again, keep these components safe somewhere separate from the others that you’ve already removed.
Use tweezers to remove the cover and pry up the screen press connector to remove the screen.
Once you’ve disconnected these components, you can safely use your angled tweezers to lift the cover and unlatch it from its hook. You can set this aside. Then, use the tip of a pick to gently pry up the screen press connector and then remove the screen.
Now that your old screen has been removed, you’re ready to install the new one. Follow these steps to safely and accurately install your new iPhone screen.
Before installing your new iPhone screen, you need to make sure the frame of the phone is clear of all old adhesive—otherwise, your new screen may not attach properly, causing issues with the display and making it more prone to damage. Use the tweezers or the spudger to work around the perimeter of the frame, taking off all the old adhesive. You can throw this away when you’re finished.
Once you’re sure you’ve gotten all of it off, use a lint-free cloth and some isopropyl alcohol (not too much, though!) to wipe the perimeter where you removed the adhesive. This ensures that any residue is gone so that your phone is prepped for the new screen to stick.
Carefully attach the new adhesive to the frame of the phone.
Now, it’s time to attach the new adhesive. If you have your self-repair kit, you can begin peeling off the liner of the new adhesive. Start slowly; peel off just the bottom edge, and align the adhesive over the lower edge of your iPhone frame. Once it’s correctly aligned, you can press it into place. Just be very careful—once you press it into place, you can’t pull it back up and reposition it. You would need to start over with a completely new adhesive.
Once the bottom is in place, you can continue peeling off the liner and pressing the adhesive onto your phone’s frame from the bottom to the top. If the bottom was aligned correctly, the rest of the frame should line up with the adhesive perfectly. Once you’re done, you can throw away the liner.
Use the tip of the spudger to gently press the adhesive into place around the perimeter of the phone’s frame. You can then remove and discard the remaining adhesive liner that may be on the front.
Before proceeding, you need to reconnect the cables and connectors you removed when taking off the old screen.
Remember all those little pieces you safely set aside when you were removing your old screen? It’s time to replace those now before fully reattaching your new screen.
The way you do this will depend largely on your iPhone model, so it’s a good idea to look at that specific manual if you’ve forgotten which parts go where. Generally, though, you can now reattach the cover and screw it in before screwing the connector shield back in. Make sure you’ve attached the ribbon-like connectors coming off the new screen into the phone.
Once these parts have all been secured, you may want to turn your phone on and check that everything is working correctly before attaching your screen. If it’s not, you can reconnect and reattach anything that may have been missed. If everything is fine, turn your iPhone back off before proceeding to the next step.
It’s finally time to attach your new screen.
It’s finally time to attach your new screen to your iPhone. Ensure that all the adhesive liners have been discarded and align the screen over the phone’s frame. Start with the top; align the top edge of the screen over the top edge of the phone’s frame, positioning it so the tabs on the screen fit in just under the top edge of the phone.
Carefully lower the rest of the screen onto the phone, firmly pressing it into place as you move down. Make sure it clicks into place and that there’s no gap between the screen and the phone itself around the entire perimeter.
Once the screen is in place, you can replace the two pentalobe screws on each side of the charging port that you removed earlier.

You’ll need to apply some pressure for about 30 minutes to make sure the adhesive bonds securely.
You’re almost done! Now that the screen is attached, you just need to apply some heat, pressure, and time to make sure the adhesive bonds strongly, preventing future damage.
The pressure only needs to be applied around the perimeter of the phone where the adhesive is attached. You can do this by placing the phone face down and placing some coins around the edges. Once you’ve done this, it’s a good idea to take your hair dryer and slightly heat the edges, allowing the adhesive to bond even more strongly.
Then, place a heavy book or two on top of the phone and leave them there for about 30 minutes. And that’s it! Now, you can power on your phone and start using it normally again.
We know that this may seem like a lot of steps to follow, but the process really isn’t as complicated as you may think. Here’s a quick recap of the steps we outlined above for both disassembling the phone and installing the new screen.
Removing the old screen | |
|---|---|
Step 1 | Before performing any disassembly or repair, it’s essential to power your phone off and take precautions to protect yourself and your phone. |
Step 2 | Use the correct screwdriver to remove the two screws at the base of the phone. |
Step 3 | Use a hair dryer to heat the bottom edge of the phone to loosen the existing adhesive. |
Step 4 | Once you lift the bottom edge of the screen with the suction, slice the adhesive with a pick by sliding it back and forth. |
Step 5 | Heat and lift the rest of the edges of the phone in a counterclockwise motion, the same way you did with the bottom edge. |
Step 6 | Swing the screen open from the left and remove the screws and connector shield. |
Step 7 | Use your tools to disconnect the front centre and unscrew the connector cover. |
Step 8 | Once everything is disconnected, you can safely remove your screen. |
Installing the new screen | |
|---|---|
Step 1 | Pull off the old adhesive and wipe down your phone frame with a lint-free cloth and some isopropyl alcohol. |
Step 2 | Take care when aligning and pressing the new adhesive into place. |
Step 3 | Reconnect all components that you took out during the initial disassembly. |
Step 4 | Carefully align and press the screen onto the phone, checking for gaps along the way, before securing the two pentalobe screws at the bottom. |
Step 5 | Let the phone sit facedown under some heavy books for about 30 minutes to let the adhesive bond more strongly before beginning to use it again. |
We get it; iPhones can be expensive to fix and replace. They’re quality devices, but they do have a certain shelf life. If your screen just isn’t worth replacing or you’re having other issues with your iPhone, it may be time to consider replacing it with a refurbished iPhone from Back Market.
We offer you The Back Market Promise, so you’re getting quality you can trust. All the devices you see on our pages, including iPhones, are cleaned, thoroughly tested, expertly repaired, and restored to premium quality. And as a bonus, these refurbished items cost just a fraction of the price of buying new. In addition to being good for your wallet, buying refurbished is good for the planet. Giving old devices a second life reduces the need for new manufacturing and prevents these electronics from ending up in landfills as e-waste before their time is really up. It’s a win-win for both you and the planet.
If you’ve made the decision to replace your iPhone, we can make it a little easier. At Back Market, we offer a trade-in program so you can get cash or credit for your old tech. All you have to do is fill out a short online form with details about your device and receive a quote from us. If you decide to accept, ship your device to us for free and once it’s verified, you’ll have the cash or credit in your account. It’s really that simple. And you can use this cash or credit towards a new refurbished iPhone to offset the costs of your replacement.
Not in the market for another iPhone? We also offer refurbished gaming accessories, computers, tablets, and more.
We know iPhones can cost a pretty penny. If a new one isn’t in the cards for you right now, consider a refurbished one from Back Market. Our refurbished options cost much less than the price of buying new—we’ll show you exactly how much less in the table below.
Model | Back Market price | Price of new | Percentage saved |
|---|---|---|---|
£358 | £1,200 | 70.17% | |
£474.00* | £599.00* | 20.87% |
*Trade-in values taken at the date of publication—these are subject to change.
If you’ve followed this step-by-step guide to replacing your iPhone screen yourself, congratulations! Your iPhone should be back in top condition. Disassembling your iPhone and attaching a new screen can seem like a daunting task, but we hope we’ve given you the tools and confidence to do so in this article.
If your issues persist, though, or if other problems have come up, it might be time to consider sending it in for professional repair or even replacing the whole iPhone. If you’re looking to replace it, we’re here for you. Our easy-to-use trade-in program helps you offset the cost, and our refurbished iPhones come with a 30-day money-back guarantee and a 1-year warranty for your peace of mind.
If you’re over your iPhone and want a different brand, though, we also have a variety of other refurbished smartphones on offer. Check out your options and take advantage of our low prices and trade-in deals today.

When not fighting the good fight for environmental sustainability, Haziq loves making reviews of everything and anything tech-related.