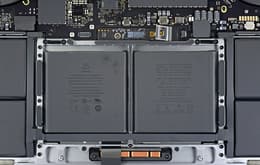
Most people don't learn how to replace an iPhone battery because Apple doesn't encourage this. It's not simply about snapping open the case and slotting in a new battery, and you can't buy batteries from Apple or any other outlet. But what if we told you that with a little effort and a few tools you can actually replace your iPhone battery yourself? If you're up for it, read on…
How to replace an iPhone battery
✨ Contrary to general opinion it is possible to replace an iPhone battery yourself. As long as you're prepared to accept that replacing the battery yourself might void Apple’s warranty if the repair causes damage. You can buy a toolkit designed for each iPhone model, all it requires is some light surgery on your phone's innards for this, but it's not too difficult if you work methodically and patiently.
Why you can trust this guide
We have many years of experience working with verified independent refurbishers who live and breathe iPhone hardware. Their insights and techniques give us a deep understanding of how modern smartphones work – including knowing exactly how to replace an iPhone battery. In other words, you can trust that we know what we're talking about. We've broken this guide down into short, digestible steps with trouble-shooting tips.
We believe in full transparency, so this guide comes with a very important disclaimer.
Please be aware that while Apple may void the warranty if repair damage occurs, UK consumer law protects you unless the DIY work caused harm. Still, tread carefully and review your warranty terms before proceeding with any repairs or replacements.
Warranty Reality Check (Fact-Checked)
DIY battery replacement doesn't automatically void warranty in the UK, as Apple must prove damage occurred due to the repair.
Apple may still service a device with a third-party battery if no damage is found.
Some parts pairing restrictions might trigger messages like “unable to verify Apple battery,” but this doesn't necessarily prevent repair.
👉 Here's more about our approach
H2: FAQs
How to replace an iPhone battery yourself
How to replace an iPhone battery yourself
Our guide on how to replace an iPhone battery will take you through the process in detail. You'll need a few tools that you can get in a purpose-designed kit. Carefully remove the display, detach the necessary brackets, and remove all adjacent components. Then pull out the battery's adhesive strips and slot a new one in. To reassemble your iPhone, reverse the steps. Make sure to keep track of each piece you remove, including all the screws, to make it easier to put everything back together again.

How to replace an iPhone battery: step by careful step
Once you see the signs that your iPhone battery is degrading, replacing it is an extremely delicate process. You'll need a few specialised tools and plenty of patience. Luckily, you can get complete iPhone battery replacement kits, like those at iFixit, that contain all the necessary tools for each model. There are small variations in the exact details of removing and replacing the battery on different iPhone models. Rather than write a comprehensive manual, we'll tell you how to replace an iPhone 11 battery to illustrate the process in this step-by-step guide. You can get a dedicated iFixit iPhone battery replacement kit for each model. They share pretty much the same tools, mainly:
Remove iPhone pentalobe screws
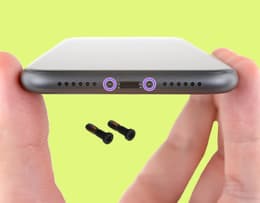
The pentalobe screws are on the bottom edge of the iPhone.
Step 1: Unscrewing the case pentalobe screws
The first step of how to replace an iPhone battery is to prep the battery first for safety reasons. Let your battery drain completely (or at least below 25%). Lithium-ion batteries are inherently unstable, and if you accidentally damage it during removal it could catch on fire if charged. Then switch off your phone. Now that your phone is off, it’s time to removing the pentalobe screws that secure the iPhone casing at the bottom edge. Do this by attaching the pentalobe precision bit to the bit driver and remove the two screws.
✨ Make sure to discharge your iPhone battery before anything else.
Troubleshooting tip: Once you've removed the screws, the next step is to open the display. This breaks the iPhone's waterproof seal, so make sure that no liquid touches the phone as you work on it.
An iPhone opening pick

You'll easily identify the opening pick.
Step 2: Prep the opening pick
Take the opening pick from the replacement kit and grab a ruler and a marker pen. Mark the pick precisely 3mm from its tip. This is the furthest you can insert the pick into your iPhone without damaging internal components. You'll be using it to pry off the display, so this is a critical step.
✨ Don't ever try to estimate the pick depth – it's essential to be accurate.
Troubleshooting tip: To avoid accidentally penetrating the iPhone edge too deeply, you can tape a coin to it so that only 3mm of the tip is exposed. This will act as a backstop.
Protecting your screen with packing tape
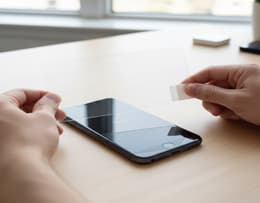
Carefully tape across the whole display.
Step 3: Protecting your screen
Be especially careful not to crack your iPhone screen while you're replacing the battery. There's no way of replacing that yourself. It doesn't matter if your phone already has a small crack – you can still complete this step. In fact, it will help the crack from spreading. Get some clear packing tape and stick overlapping strips to the screen until it's completely covered.
✨ Don't add insult to injury – tape your screen so you don't damage it too.
Troubleshooting tip: The suction cup needs to attach to the taped surface, so make sure the tape is completely smooth without any air bubbles.
Heating the bottom half of an iPhone

An ordinary hairdryer works as well as a purpose-built iOpener.
Step 4: Heat the bottom half of your iPhone
This is where things might start sounding a bit weird. What you want to do next is heat the adhesive underneath the screen so that it softens, allowing you to pull off the front display. You can use an everyday hairdryer for this. Place the nozzle over the bottom half of the display and turn it on for about a minute.
✨ Only heat the bottom half of the display, placing the suction cup in the centre, not at the edge.
Troubleshooting tip: If a hairdryer doesn't work, you can get a purpose-designed iOpener, which is similar to those padded neck warmers that you warm in a microwave oven. Heat it and lay it across the display.
Lifting an iPhone display with a suction handle
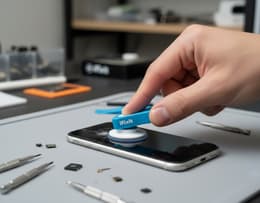
Slowly lift the display with the suction handle.
Step 5: Detach the display screen
Now you're ready to remove the display screen. Get the suction handle from the replacement kit and attach it to the heated bottom half of the display. Use firm constant pressure to slowly lift the screen slightly. Just enough to create a gap underneath so you can insert the opening pick. Then insert the pick at the bottom corner and slide it up all the way up the side to the top, to cut through the adhesive that secures the display to phone casing. Do the same thing from the other bottom corner.
Now for the top of the iPhone screen. There's a clip on either edge that you'll have to defeat here. (If this is starting to sound like levelling up in Skyrim or Baldur's Gate, bear with us.) As the display is loose at the bottom and edges, you can slowly slide it downwards towards the charging port until there's space to insert the opening pick at the top right-hand corner. Then slide it across the top to slice through the last remaining adhesive. Your screen should now be removable, but you don't want to use the suction cup for this, so remove that by pulling the small nub on its edge.
✨ Remember: never insert the opening pick deeper than 3mm.
Troubleshooting tip: The right edge of an iPhone contains delicate cabling that is extremely easy to damage. Only insert your pick at the corners of your phone, never on the right side.
Removing an iPhone display screen

Open your iPhone like the back cover of a book.
Step 6: Remove the display screen
You'll now be able to open the phone by lifting the entire display from the left-hand side, as if you were opening the back cover of a book. Then prop up the display against something solid and stable to prevent it from moving. Slightly tilt the display at its lower edge so that you can access the battery connector screws in the next step.
✨ Open the display very gently to avoid damaging the ribbon cables.
Troubleshooting tip: You only need to open the display case at this point. Don't detach it completely yet. This will damage fragile parts that could make your iPhone unusable.
Removing iPhone brackets and connectors
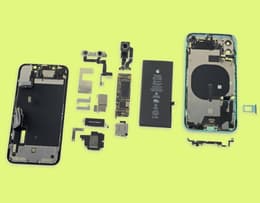
Carefully remove each internal bracket and connector.
Step 7: Remove the brackets and connectors
Locate the battery connector cover at the bottom right edge of the inside of the iPhone body. Remove the screws from the battery connector bracket using the Tri-Point Y000 precision bit. Gently remove the bracket using the tweezers. Then take the spudger and use it to disconnect the LCD cable connector you see underneath. Do the same thing with the front panel sensor assembly connector towards the top right of the battery.
Now you can safely remove the whole display from the rest of the iPhone and focus on unscrewing the rest of the components necessary to take out the battery.
Look for the TAPTIC ENGINE label, just below the bottom of the battery. You'll see five screws that secure a bracket beneath it. Use the Phillips screwdriver to unscrew them and take off the bracket. Then very carefully use the tweezers to detach the little rubber pad on the right of the taptic engine.
Next, look to the right and you'll see a further set of Phillips screws that secure the speaker bracket. Remove these too. Delicately take the grounding clip off the speaker using your tweezers. It's located at the speaker's top right corner. There's one more hidden screw underneath a small board at the extreme bottom right corner. (Yes, this really is turning into an RPG quest, but we're almost there.) Push it aside to loosen that one.
Grab your spudger again and use it to pry up the top right edge of the speaker, right at the edge of the casing. Using your fingers, hold the speaker by the sides and gently rock it to loosen the adhesive and remove it. Finally, look for the Phillips screws that secure the taptic engine on its left. Unscrew them and use the spudger to first disconnect the flex cable and then the taptic engine itself.
✨ Slowly remove the internal components in the order above, working methodically and carefully.
Troubleshooting tip: If you're having trouble locating these various components, you can find plenty of photos online with each one clearly labelled.
Removing your iPhone battery
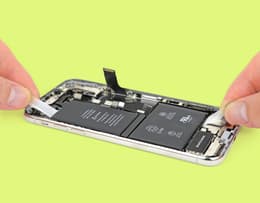
Start removing the battery using the pull tabs.
Step 8: Remove the battery
Finally we've reached our destination, the battery itself. But don't just rip the thing out. Yep, you guessed it – there are a few more finicky steps involved, but it's child's play from here on.
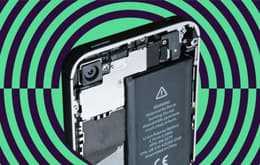
The battery is attached to the body of the iPhone by six adhesive strips that run underneath it. Each has a pull tab to use for removal, three at the top and three at the bottom. These are black and folded down onto surface of the battery. Use the spudger or tweezers and gently lift the three tabs at the bottom of the battery first.
Now very slowly pull the strips out from under the battery. And we do mean slowly. It should take around 30 seconds for the adhesive to release completely. The strips will stretch at first and then start sliding out as the adhesive bonds break. Keep a low angle so that you don't catch the strips on the battery's edge. Then repeat the process on the other two bottom strips. Afterwards, move on to the three top strips. All that remains is to remove the battery itself, ready to be replaced. You can just lift it out with your fingers.
✨ Lift the battery adhesive strip tabs and slowly pull them out, one by one.
Troubleshooting tip: Be very, very careful when lifting the pull tabs with the spudger. You're now working directly on the battery, and we've explained the fire dangers of damaging it in any way.
Step 9: Replace the battery
Follow the above steps in reverse order to install a new battery. The new battery will come with adhesive strips, so you can discard the ones from the old battery. Reattach the taptic engine before you insert the new battery for better seating. Then replace the speaker, screw the brackets on again, reattach the display, and you're good to go.
✨ Perform the above steps in reverse to install a new battery.
Troubleshooting tip: If your phone throws up a message that you have an unauthorised battery installed, do a forced restart.
How about a refurbished iPhone?
If you'd rather not go through this whole process to replace your iPhone battery, you can skip it all and replace yours with a freshly updated refurbished iPhone at a fraction of the cost of getting a new one. In some cases, you'll probably pay less than you would to have your battery replaced by an iStore. What's not to like? You can get an upgraded model for a large discount – up to 50% off the retail price.
Refurbished phones perform every bit as well as new ones, because they've been completely overhauled and restored. Damaged parts have been replaced and they've undergone a deep clean. Then comes a battery of tests (pun fully intended) to ensure that they perform up to the original new benchmarks. This ensures that you get a reliable iPhone that works just as well as a new one. We back this up with a 1-year warranty on every device we sell. Buying refurbished isn’t just cheaper – it’s more sustainable. It’s about rescuing a perfectly functional device and giving it another life. That's good for your wallet, and for the planet.
Score more with our trade-in program
You can save even more money when you get a refurbished iPhone by trading in your old one, defective battery or not. It's dead easy. Just enter the specs and condition in a short online form and you'll immediately get an offer from one of our verified refurbishers. Like the deal? Then ship us your old phone (for free) and you'll be paid within five working days.
Save money on refurbished iPhones
Here's how much you can save on various refurbished iPhone models if you don't want to replace a defective battery yourself. This is just a small sample of what's available on Back Market.
Product | New Price | Back Market Price | Savings |
|---|---|---|---|
£707.90 | From £116 | 83.61% | |
£1,201.01 | From £144 | 88.01% | |
£1,259 | From £116 | 84.51% | |
£1,979 | From £325 | 83.58% | |
£1,599 | From £490 | 69.36% | |
~ £599.00 | From £499.00* | 16.69% |
*Back Market prices taken at the date of publication – these are subject to change.
To summarise
Now you know all you need to know about how to replace an iPhone battery. Using the right tools and this guide, all you need is a steady hand and a bit of patience. The process involves delicately removing the display screen to access the inner components. You then need to unscrew the brackets that secure the taptic engine and the speaker, and remove both. This gives you unfettered access to the battery. Use the pull tabs to stretch out and remove the six adhesive strips and then you can lift it out. Replace it with a new one and reassemble your phone following the same steps in reverse order. And if you'd rather just have a replacement iPhone, you can get fully refurbished models on Back Market.

